
101 things to do with Soak | 011 Removing Paint from brushes
Posted: 20/04/2010 Filed under: Craft, Design, Uncategorized, Uses for Soak | Tags: 101, hand washing, paint brushes, soak wash, soakwash, wash Leave a commentAuthor: Ngoc
If you are anything like me, then you’re guilty of abandoning your paint covered brushes as soon as the first coat is done, to sit, relax and reward yourself with a drink. This results in many curses the next day when you go to paint your second coat, only to find the rollers and brushes completed caked in dry paint due to your laziness the day before. 10 minutes will then be spent trying to remove the dried paint before giving up and making a trip to the hardware store to pick up another set. To avoid this frustration and extra cost, I’ve vowed to take a page from Jacqueline’s book and become a diligent brush washer.
Jacqueline is in the midst of renovating her apartment one room at a time. She is no stranger to primer, paint, rollers and brushes. She’s taken photos to show us all how painless and easy it is to wash your brushes with Soak as soon as you are done using them.
Pour a little soak on the brush and swish it around your hand to remove most of the paint.
Don’t forget to wash between the bristles.
As good as new and ready to tackle on another day of painting.


101 things to do with Soak | 010 Washing fabric purses
Posted: 13/04/2010 Filed under: Uncategorized, Uses for Soak | Tags: 101, hand washing, purse, soak wash, soakwash, wash Leave a commentAuthor: Ngoc
This purse is made with a simple yellow and black fabric bag decorated with embellishments. I’ve made the mistake of throwing embellished clothing and accessories in the washing machine before only to have them come out more naked than when they went in. So this time, I smartened up and used Soak instead.

This purse, though not extra stylish, chic or expensive, has a very dear place in my heart. It is one of the only souvenirs I picked up when I went to visit my family in Vietnam 3 years ago. It was a very eye opening and enriching experience to learn about the culture and to experience how drastically different their lives are in comparison. One of my favorite memories was floating in the beautiful blue waters of Nha Trang, in this little tiny “glass bottom boat” while the gentleman beside me shaded me from the sun with his umbrella. 
With summer just around the corner, I wanted my bag to be clean and ready for all my summer adventures. I left the bag to soak for 15 minutes and was shocked at how dirty the water was. I guess it needed this soaking more than I had thought. Now all I need is for the weather to stay warm.
101 things to do with Soak | 009 Phil becomes a cat bed
Posted: 06/04/2010 Filed under: Uncategorized, Uses for Soak | Tags: 101, phil Leave a commentAuthor: Ngoc
Everyone here at the office loves Phil. We use him to soak our hand washables, and store our dirty lingerie. We plan on taking him with us to the park to use as an ice bucket, or to wash the sand off our feet at the end of a beach trip.
We never even considered that we’d have to share him with our furry friends. One of our customers, Katherine, sent us her story about how Phil has now become property of her beloved Winnie Fat Cat.

Winnie Fat Cat in all her 14 years of wisdom knows a stylish bed when she sees one. She thinks of Phil as hers and no one would dare to argue otherwise. One day, Katherine heard Winnie Fat Cat calling out loudly. When she went to investigate the situation, she learned that the reason for Winnie’s cries were due to the fact that Phil had been rotated and pushed into a corner so that the handles were no longer accessible. Now why would this be a situation you ask? Well the textured handles on Phil that were designed for easier carrying, are also perfect for scratching your face against if you are a cat. After moving Phil so the handles faced outwards, Winnie quieted down and began to scratch her face. What a character she is.
Thanks Winnie Fat Cat and Katherine for the story and the great photos!
Would you like to surprise your furry family member with a new bed? Phil is now available for purchase at soakwash.com.
101 things to do with Soak | 008 Washing canvas shoes
Posted: 30/03/2010 Filed under: Uses for Soak | Tags: 101, hand washing, shoes, soak wash 2 CommentsThis week’s Soak idea was contributed by one of our customers.
White shoes are a good idea in theory. When you try them on at the store, they’re beautiful and clean and look very smart. Now you can do everything in your power to tip toe around puddles, and not walk in dirt, but it’s inevitable. White shoes attract stains.
This specific story involves a brand new pair of white converse shoes and a steaming hot cup of coffee. He’s finished about half of his cup of Tim Hortons, but it happens to be during roll up the rim season, and he’s just too anxious to discover if he’s won a car. So carefully he tries to roll up the rim with the cup half full. Disaster. His poor white shoes have taken the brunt of the accident. He also won the chance to play again.

How to clean coffee stained white canvas shoes. He figured his black canvas shoes were also due for a good cleaning
Materials
Dirty canvas material shoes
Bucket of water
Wash cloth
Soak wash
Add soak to your bucket of water. He added some more Soak to the washcloth to make it a little more concentrated. Scrub the stains gently. Depending on the shoe, you can just leave them in the bucket to Soak. You can rinse if you prefer.

Put on a drying rack to dry. If you had soaked your shoes, you may want to stuff a sock inside for the first little bit to help maintain the shape of the shoe. Success. Shoes look brand new again.

Do you have a fun Soak story? Send it to us with photos, and if we feature it, we’ll send you a special Soak treat.
101 things to do with Soak | 007 Cleaning makeup brushes
Posted: 23/03/2010 Filed under: Uses for Soak | Tags: 101, soak Leave a commentAuthor: Hannah (our co-op student)
As a girl who applies a bit of makeup daily, I can vouch for the importance of keeping your brushes clean. I use at least two different types of brushes every day so by the end of the week, there is a lot of bacteria, oil and make up residue built up on these brushes.
Keeping your brushes clean will help prolong its life and help with smooth application of makeup. Here at the Soak office, we discovered that Soak does a great job at keeping brushes clean.

You can plug your sink and fill it with a bit of water and add a small squirt of Soak. Less than half a teaspoon is sufficient.

Gently swirl and wipe the brushes being sure not to press too hard or you may cause the bristles to misshapen. We would also recommend you not leave your brushes in to soak as it may cause the glue that holds the bristles together to loosen. After gently swirling, you can see all the old makeup that was in your brush come out in the water.
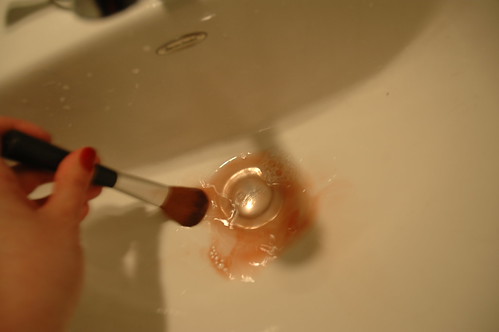
Gently wipe your brush against a paper towel or cloth to dry it off a bit. Then leave it lying on a cloth to air dry. I personally take a piece of paper towel and wrap the brush head to help maintain the shape as it air dries.
This test was done using MAC cosmetic brushes. We love our MAC brushes and keeping them clean with Soak will help them last for years.
101 things you can do with Soak | 006 Giving well loved teddies a bath
Posted: 16/03/2010 Filed under: Uses for Soak | Tags: 101, hand washing, shoes, soak wash, teddy 2 CommentsAuthor: Ngoc
If you have kids, then you can understand the adventures that a well loved teddy bear goes through. And Mr. Teddy sure attracts some dirt, stains, and other battle scars along the way. Now those teddies COULD be thrown in to a washing machine, however, I along with many of our customers opt to use Soak instead.
Now I will never forget the time my mom threw my beloved Jesse bear in the washing machine, and he came out with not just one, but both of his arms missing. This was a very traumatic experience that could have been avoided if only we had Soak back in the day. 18 years later, Jesse bear still has the stitches from this accident.
Take a look at these pictures that one of our loyal customers has submitted of her daughter giving Teddy a bath.
“My daughter’s teddy is on his last legs (too fragile for the washer) but at the same time is extremely filthy – yuck!! Teddy has had his bath and he looks great – no damage!”

Just fill a basin with water. Add some Soak. Leave Mr. Teddy in there for 15 mins. Maybe give him some privacy if he’s shy. Squeeze out as much water as you can and then squeeze between a towel. Then leave him on a drying rack to completely dry.
It’s so simple that your son or daughter could do it!
101 things you can do with Soak | 005 Removing dirt and oil off wildlife
Posted: 09/03/2010 Filed under: SWeco, Uncategorized | Tags: 101, soak wash 1 CommentAuthor: Ngoc
Most of us have heard stories about oil spills and their effects on wild life. One of our customers, Laura Westlake is a licensed wildlife rehabilitator and she sent us her Soak story.
“I can’t tell you how much I love your product. As a licensed wildlife rehabilitator, I use your “Soak” to bath my wild birds that need more than just water to clean their feathers. It is non toxic and gets the “bad” dirt and oil off them safely! I also use “Soak” to wash my 11 year old dog. I’ve used all other dog products, but there is none that compare to the way it cleans and makes her fur feel. It is also so gentle on the skin. It is the best!”
– Laura Westlake

 These are two birds that she has saved. They are happily swimming and bathing after she has clean the oil and dirt off their feathers using Soak.
We all loved her story and it stirred my curiosity about how exactly the oil effects the birds. Here is a summary of why oil spills are so detrimental and how wildlife rehabilitators are saving these birds. The information for this post was taken from here.
If you’ve ever looked at a feather closely, it has the stem in the middle and little veins coming out of both sides of the stem. These veins are then covered in tiny little barbs. All the little barbs link together to create a water proof barrier to prevent water from seeping in and keeps their skin nice and dry. When their feathers become covered in oil, the barbs don’t link together smoothly and the feathers clump and leave gaps, which essentially strip the feathers of their water proofing nature. Birds will then try to preen their feathers to smooth them out and in the process they will ingest the oil which is toxic and damages their organs. If left too long with oil on their feathers, these birds tend to freeze to death due to their inability to keep the water off their skin.
These wildlife rehabilitators find these birds and clean their feathers with a mild soap or in Laura’s case, Soak. They feed the animals until they are back to a healthy weight and free them back into the wild.
Thanks for the great story Laura!
101 things you can do with Soak |004 Wash Stinky Hockey Gear
Posted: 02/03/2010 Filed under: Uses for Soak | Tags: 101, hockey, soak, wash 3 CommentsAuthor: Ngoc
I’m sure many of you are coming down from your Olympic high. I’m not normally a huge sports fan but for the past 3 weeks, you wouldn’t know it. I was filled with Canadian pride while cheering hard for the home team. I’m still pumped about our gold medal wins in both women’s and men’s hockey so it only seems appropriate to dedicate this week’s posting to Canada’s game.
If you play hockey, or have had the pleasure of living with someone who plays hockey, you can understand how bad the equipment can start to smell. Now my friend’s helmet had about 3 years of sweat accumulated inside of it and smelled so bad that he was considering just purchasing a new one altogether. So I suggested that he give Soak the chance to save the helmet and use the money he saves to take me to dinner.


Now the helmet and gloves just float on the surface so we had to dunk it down every once in a while. You could just put something heavy on top to keep them submerged in water while they soak.
Now there are mixed reviews on whether or not you should submerge your helmet in water as some of the adhesive may loosen. So although I did it with much success, please try this at your own risk. I figured, while we were at it, the hockey gloves could also use a good cleaning. In hindsight, we should have just filled up the whole tub and threw in all the equipment.
Now I did read that most hockey gear can be thrown in the washing machine, however, hand washing will prolong its life. Considering how expensive hockey gear can get, the longer you can make it last, the better.

Look at how brown that dirty water is! To think, all that was from his helmet and his gloves! GROSS!
Here he is wearing the clean helmet and ready to hit the ice!
Now although soaking it did get rid of almost all of the stench, if you sniffed really closely, you could get a hint of some lingering odors. A second soak may take care of this, but compared to how awful the helmet and gloves smelled beforehand, I’d call it a great success. Try it for yourself and tell me about your success stories.
101 things you can do with Soak |003 Prewash fabrics
Posted: 23/02/2010 Filed under: Uncategorized | Tags: 101 Leave a commentAuthor: Ngoc
Prewashing helps to avoid unexpected color bleeding, or shrinkage.
We would highly recommend prewashing your fabrics if they are very deep or vibrant in color. You wouldn’t want those dyes to transfer on to the surrounding fabric.
Another issue is shrinkage. Different fabrics will shrink differently. This is an issue when using many different types of fabrics in one quilt. Your finished quilt may pucker around the seams if the fabrics are not prewashed. Some quilters prefer this look and opt not to prewash for this very reason.
We’ll admit that we are not always diligent with our prewashing, however when we do choose to prewash, you can bet that we reach for Soak. Wash like colors together either in a washing machine or soak in a basin.

This is one of the many beautiful quilts that Jacqueline has laboured over.
101 things you can do with Soak |002 block felt and finish
Posted: 16/02/2010 Filed under: Uncategorized | Tags: 101, blocking, Knitting 1 CommentAuthor: Ngoc
Soak was first launched in the knitting industry as a way to care for your hand knit pieces. Knitters quickly realized that Soak was also great for blocking, felting and finishing their knit and crochet projects.
Blocking is a term that most knitters have heard of, and know that they should do. However, many are guilty of skipping this step. Blocking allows for the piece to be stretched and shaped into the right dimensions. This is especially important if you took the time to create a beautiful intricate lace pattern. Blocking will help to “open up” the designs to show it’s true potential. Below we show a beautiful scarf that Chris made with only the right side having been blocked.

Remember to refer to the yarn’s ball band for care recommendations before soaking it in the water.
How to block
- Use cool water when blocking or your piece may shrink.
- Add your low-suds detergent. Remember to use only one teaspoon per gallon of water. Don’t let the lack of bubbles tempt you into adding more.
- Soak your piece for 2 to 15 mins depending on the yarn type. Most yarn washes do not contain harmful ingredients so do not fret if you accidentally leave it in for longer.
- Remove excess water by gently squeezing the piece against the side of the sink or wash basin. Avoid lifting a soaking knit piece out of the water as the weight may distort the shape of it.
- Roll the knit piece in a towel absorb the rest of the excess water
- Block your piece by laying it flat on a towel or blocking board and shaping it as you go.
Lay it flat to dry. Try to find a place with good air circulation on all sides. Flip the piece over half way through the drying process to help keep the shape. This picture compares an unblocked piece to a blocked one. Notice how the piece lays flat and the stitches are evened out in the blocked square.

Click here for the full article on blocking and washing hand knits from Knit Simple.


