
Soakbox Knit-A-Long: Vogue Knitting Live
Posted: 31/10/2012 Filed under: SWmain Leave a commentOver the next few weeks we are running a knit-a-long for the four patterns in our Soakboxes. We will be posting detailed information on each of the patterns as well as fun things you can do with your Soakboxes for yourself, as a gift and as a group. You can order a kit from us directly, just click on the link on the right, or you can ask for it by name from your local yarn store. May your hands be soft, fibers fresh and nails match your knits!
We just got back safely from Vogue Knitting Live Chicago, what a blast! Jacqueline and Chris’ flight was delayed by a day, but it was better than flying into the crazy wind we had here in Toronto that Monday night! Luckily they had Beth around to host them while they waited for the hurricane to settle down.
We had so much fun talking to people about Soakboxes in our booth. Beth of Lorna’s Laces and Fiona Ellis came by a couple of times over the weekend to chat to customers and sign patterns.


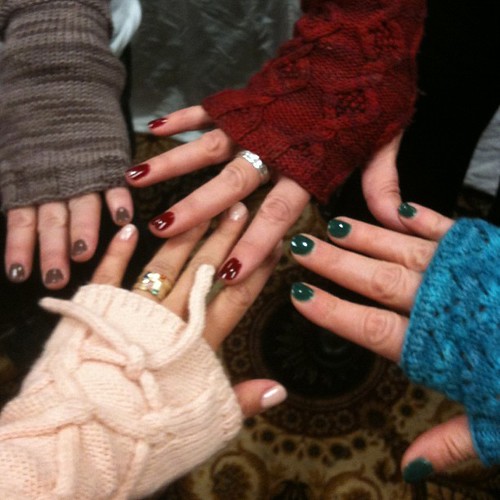
One fun part of the weekend was being able to wear the samples. We had a little manicure party before the show started so that everyone would be in the Soakbox spirit. We had one of each colour on display!
Thank-you again for stopping by our booths at Rhinebeck and VKL Chicago. We can’t wait to see the Soakboxes knitted up and hear about what you are washing with Soak. Let us know in the comments!
Soakbox Knit-A-Long: Clark Cable
Posted: 26/10/2012 Filed under: Knitting, SWmain Leave a commentOver the next few weeks we are running a knit-a-long for the four patterns in our Soakboxes. We will be posting detailed information on each of the patterns as well as fun things you can do with your Soakboxes for yourself, as a gift and as a group. You can order a kit from us directly, just click on the link on the right, or you can ask for it by name from your local yarn store. May your hands be soft, fibers fresh and nails match your knits!
Clark Cable is one of the more advanced patterns in our series, but one of the great things about fingerless mitts is that they make great canvases for practicing new techniques! Cables are often thought of as really advanced, but the truth is that they are surprisingly easy, and they make a great visual impact. We are sure you will have all your friends asking after them when you are done!
Cables
As always Knitty has a great tutorial with photographs on how to work cable stitches.
Errata
There is one tiny mistake the original pattern. We did go through and manually correct the patterns that are in the boxes, but we will mention it here again, just incase one was missed, or if you aren’t sure what it means.
In round 14 it should read as: P3, k3, turn work so that WS is facing; you will re-work the last 6 sts once more, and all the way round. WS now facing: K1, (p2, k6, p3, k1) four times, p2, k6, p2, k1. Turn.
Needles
Choosing needles when working in the round on small circumferences can be a bit of a puzzle. In this case Isobel, our test knitter, recommended working with two short circular needles rather than double points as she found the cable needle plus lots of needles a bit of a handful.

Ladders
What are ladders? Well, other than something that you use to reach that last can of chickpeas in the pantry, they are a pesky side effect of knitting in the round. What happens is that there is too much yarn going from one needle to the next and it creates a gap between the stitches that looks like a little ladder. Due to the reverse stockinette background of the pattern it is bound to show up a little bit, but there are a few ways to minimize things.
One way is to make sure that the first and last stitches on your needles are pulled snuggly to reduce the amount of extra yarn.
Another is to use magic loop or two circs, as this will give you two sets of ladders instead of the three that you would get with dpns.
Whatever you decide to do, I am sure that the overall effect of the ladders will lesson once it is blocked. Isobel found that once she had washed them in Soak and eased them into shape, the ladders disappeared all together!
Yarn Quantity
It is always a good idea to check your gauge on a pattern, but there is an extra reason to do it on this one. There isn’t a lot of extra yarn, so you are going to want to make sure that your mitten isn’t going to accidentally come out too big as you will then run out of yarn. It is easier to check that your needle size is right and start over than to knit 1.75 mitts and discover that you have run out!
Happy Knitting!
Weekly Affirmation: Rhinebeck
Posted: 25/10/2012 Filed under: SWmain, Testimonials 1 CommentEvery Thursday we post a comment, tweet, email or secret message we’ve received from one of our Soakworthy customers (stores, fans, consumers, friends). Sometimes, on a rough day, it’s really helpful to read an inspiring message from someone in our community. Someone who appreciates what we do. Someone who is as passionate about Soak as we are. We appreciate all the love that comes our way. Really we do.
We got this great email from a happy Soak customer this week. Thanks Ally, we are so glad to hear that you had a good time!
Hi,
I wanted to let you know how happy I was to see your booth at Rhinebeck. The people who worked at your booth were so nice and very friendly. I bought a large bottle of lacey and a large bottle of Heel, and will always think of Rhinebeck when I use your products!
thanks,
-ally rich
Don’t forget to come on by our booth at Vogue Knitting Live this weekend!
Weekly Affirmation | Blog Comment Love
Posted: 25/10/2012 Filed under: Craft, Soak Worthy People, SWCustomerContributions, SWhowto, SWmain, SWProducts, SWpromotions, Testimonials | Tags: Knitting, lornas laces, nail polish, soak, soakwash Leave a commentEvery Thursday we post a comment, tweet, email or secret message we’ve received from one of our Soakworthy customers (stores, fans, consumers, friends). Sometimes, on a rough day, it’s really helpful to read an inspiring message from someone in our community. Someone who appreciates what we do. Someone who is as passionate about Soak as we are. We appreciate all the love that comes our way. Really we do.
We love feedback on the blog (clearly you know about it, as you’re already here!) As you may know we just ran a Soakbox contest, promoting our Knit-A-Long, leading up to the holiday. We asked a question. “What is your preference: french manicure, or solid colour for your nails?” All you had to do was answer. (we keep it simple like that). This was one of our favorite comments, among the hundreds that poured in. Watch the blog throughout the season, we’ll be posting a lot of knitting lovin’. Thanks!
“I was so caught up in the pretty I forgot to answer the question…solid color for me : )”- Amber

Soakbox Knit-A-Long: Cuff au Lait
Posted: 24/10/2012 Filed under: SWmain Leave a commentOver the next few weeks we are running a knit-a-long for the four patterns in our Soakboxes. We will be posting detailed information on each of the patterns as well as fun things you can do with your Soakboxes for yourself, as a gift and as a group. You can order a kit from us directly, just click on the link on the right, or you can ask for it by name from your local yarn store. May your hands be soft, fibers fresh and nails match your knits!
Does lace get you down? Are cables leaving you twisted up? Cuff au Lait is the mitt for you! The cuff on this one is actually a mock cable. All of the texture is achieved by making strategic increases and decreases which move the stitches around on the fabric without actually having to move them. Ingenious!
This is also a great project if you are uncomfortable working in the round. The cuff of the mitt is worked flat, so there is very little working in the round.
So first knit the cuff. I knit mine on a circular needle, but a straight would work as well.

Then divide your stitches across the needles you will be using to knit in the round. You could divide them across two short circulars, or for magic loop. The white dpn on the far right are the 8 or 12 stitches that have been slipped off. Whatever technique you use it is probably easiest to put those ones on a dpn.

Curl your knitting up so that the left side (the side with your working yarn attached) goes over the spare dpn.
In the instructions it says to knit the stitches from the front and back needles together. To do this insert your needle through the front one as normal, then slide it into the back one as well. Wrap your yarn around as normal, then pull it through both loops, and push both stitches off the needles. Do the same for the remaining needles.

And voila! The stitches have overlapped. You can continue to knit the cuff in the round.

As always we love to see and hear what you have done with your Soak products. We’ve found another Soakbox Finished Object post for you to enjoy! Katie knit up her Cuff Au Lait Mitts and wrote all about them. Thanks Katie!
http://katiesredumbrella.blogspot.ca/2012/08/soakbox-mitts-finished.html
Vogue Knitting Live
Posted: 23/10/2012 Filed under: SWmain Leave a commentThank-you so much for coming to visit our booth at Rhinebeck! It was so great to meet and see so many people over the weekend.
Of course, it is only the middle of the fall fiber festival season, so the break we get is very short. Jacqueline, Chris and Natalie will all be at Vogue Knitting Live this weekend as well!
We will have more Soakboxes, so if you are in the Chicago area c’mon by and pick yours up!

We will also be having signings with Beth and Fiona at our booth from 12:30-1:15 on Saturday and Sunday. Hope to see you there!

The comments are closed for our Soakbox contest. We are happy to announce that the winners are Linda R. and Heather D. We will be in contact with both of you to get your addresses to send out the boxes. Thanks for entering!
Soakbox Knit-A-Long: Dying Yarn
Posted: 22/10/2012 Filed under: SWmain Leave a commentOver the next few weeks we are running a knit-a-long for the four patterns in our Soakboxes. We will be posting detailed information on each of the patterns as well as fun things you can do with your Soakboxes for yourself, as a gift and as a group. You can order a kit from us directly, just click on the link on the right, or you can ask for it by name from your local yarn store. May your hands be soft, fibers fresh and nails match your knits!
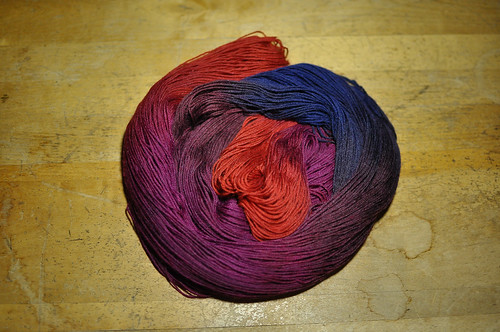
We love how our Soakboxes have Soak products in them, but we also love how we were able to team up with Beth of Lorna’s Laces for the yarn that goes into each box. Jacqueline had a blast going to the Lorna’s headquarters in Chicago to pick and dye yarn for each of the boxes.

It’s kind of amazing how you can take a plain, bright, white skein of yarn and turn it into something so beautiful.

Jacqueline was the one who picked the four colours for our boxes, but it is Beth who has gone through and made the formulas and is dying the yarn every month (sometimes more often) for us.

Did you know that we hadn’t originally planned for the yarn, polish and bottle labels to match? Jacqueline went and played around with colour and dyed up her favourites. When she got home we took one look at the colours and realized that they all matched! It was perfect without even trying. It is so interesting how we tend to gravitate to the same colours in many aspects of our lives.

Sometimes I look at yarn and it is just the perfect combination of colours, and I can hardly bear to knit them up. It makes yarn a unique canvas for artistic expression. It can be pure colour fun.
Do you have any colours that you gravitate to unconsciously?
Thank-you so much to The Workroom in Toronto for letting us use these photos from the Yarn Dying 101 class that Beth taught over the summer. They are fully stocked with Soakboxes.
Soakbox Knit-A-Long: Double Pointe Pink
Posted: 19/10/2012 Filed under: SWmain Leave a commentOver the next few weeks we are running a knit-a-long for the four patterns in our Soakboxes. We will be posting detailed information on each of the patterns as well as fun things you can do with your Soakboxes for yourself, as a gift and as a group. You can order a kit from us directly, just click on the link on the right, or you can ask for it by name from your local yarn store. May your hands be soft, fibers fresh and nails match your knits!
Needles
Due to the cable along the front half of the mitt, the Double Pointe Pink may require some adjustments to avoid laddering between the needles. If you want to read more about laddering, we have some suggestions about it on out Clark Cable post. The biggest difference between the two patterns is that this design has cabling only on the front of the mitt, so it is much easier to avoid unsightly stitches. The best thing to do is to make sure that all the gaps between needles happen on other part of the mitt. This would work fairly well for the beginning portion of the mitt, but due to the wrist shaping there is a section that only has about 14 stitches on the back half. If you are using double pointed needles that would leave you 36 stitches on one needle and 7 or less on the other two! Now, that’s not a very comfortable knitting situation.
To avoid it you could shift the stitches around a bit just for those few rows where there aren’t as many stitches and watch for any laddering. This is also a perfect example of magic loop or two circulars being a good technique to know, as it would reduce some of the awkwardness.
Errata
Rnd 14 Written Instructions should read: Rnd 14: K4, p11, k6, p11, k4. The charted instructions are correct.
I-cord

I-cord is the technique that is used to make the cords that tie on the back of the hand.
It sounds like a strange and silly technique, but it is really quite easy. Pick up four stitches as instructed in the pattern, then slide them to the other end of your dpn or circular needle. Then knit into the first stitch, pulling the yarn tightly across the back of your work. Once you have knit the four stitches, slide them back to the end of the needle and start again. That’s all there is to it! Because there are so few stitches, it will curl up into a little tube. It is much easier to work i-cord than to try and knit in the round on four needles with so few stitches!

We have already found a few blog posts about knitting up Soakboxes. Check out this one with gorgeous photos of finished Double Pointe Pink gloves!
http://knitty-kat.blogspot.ca/2012/09/fo-double-pointe-pink.html
Weekly Affirmation: White Quilt Rescue
Posted: 18/10/2012 Filed under: SWmain, Testimonials, Uses for Soak | Tags: guild, hand washing, marking, pencil, quilting, sewing, spot cleaning, stain, washing, washing quilts Leave a commentEvery Thursday we post a comment, tweet, email or secret message we’ve received from one of our Soakworthy customers (stores, fans, consumers, friends). Sometimes, on a rough day, it’s really helpful to read an inspiring message from someone in our community. Someone who appreciates what we do. Someone who is as passionate about Soak as we are. We appreciate all the love that comes our way. Really we do.
Anonymous posted on the blog a while back.
“At the Guild we had a white quilt with marking pencil tracings that would not come out despite trying several different methods that usually work. We had a small sample of soak so decided to try it. We diluted it with a bit of water and dabbed it on the lines. Magically they disappeared leaving no residue and we had a much relieved quilt maker.”
So glad to hear that the quilt was saved! You can hop on over to our 101 Soak Uses to check out other creative uses for Soak products.
Soakbox Knit-A-Long: Lace Kelly Tutorial
Posted: 18/10/2012 Filed under: SWmain 3 CommentsOver the next few weeks we are running a knit-a-long for the four patterns in our Soakboxes. We will be posting detailed information on each of the patterns as well as fun things you can do with your Soakboxes for yourself, as a gift and as a group. You can order a kit from us directly or you can ask for it by name from your local yarn store. May your hands be soft, fibers fresh and nails match your knits!
Lace Kelly is probably the easiest of the four mitts, and is a great project to practice knitting lace. The cuff detail is only a handful of rows, so nothing to get too overwhelming. We love how organically the thumb grows out of the lace pattern. It is sure to add a touch of old Hollywood glamour to your day, even if it is just running out to the shops!
Needles
As with any small project knit in the round, there are a few options for what kind of needles (double pointed needles, magic loop, 2 circulars) to use. For the most part your choice will come down to personal preference, though there are a few pros and cons to each style. In the case of Lace Kelly I think that it mostly comes down to pros. Due to the relative simplicity of the design, there aren’t any strong cases against a needle type.
The biggest difference between the styles is the stitch counts on each needle. There are a few ways to arrange your stitches. This will change depending on which style you choose.
If you are using 4 double pointed needles you will want to divide the stitches evenly by 3 to fit around your needles. This is all well and good for the small size, as 48 divides quite nicely by 3 so that you have 16 stitches on each needle. Things are a little tricky for the larger size, which has 56 stitches and does not divide evenly by 3. It seems that it is a bit tricky to get 18.666666667 stitches on one needle! The stitches must be divided up as evenly as possible though, and there are two ways to do this. The best thing to do when deciding how to divide the stitches is to look at the pattern repeats in the design and go from there. Luckily Lace Kelly is quite simple and lends itself to dividing by pattern repeats very well. The main pattern has an 8 stitch pattern repeat, which means that we can divide the stitches around as 16-16-24. It does mean that margin of stitches between the needles is quite large, but has the added bonus of keeping the repeats together. Some people may find this annoying, which leads us to the second option of just getting the stitches as close to the same number of stitches as possible. This would give you 18-18-20 stitches on each needle. The downside of this is that there will be a few pattern repeats that span over two needles, which could be confusing to a newer lace knitter.

Special Stitches
Speaking of lace knitting, I am sure that you will find most of the stitches in this pattern familiar to you, even if you are new to lace knitting. K2tog and ssk are very common decreases, often found in the top of hat, mittens and all sorts of other projects. The other two stitches are very common in lace knitting, but are less common outside of lace knitting. These are a yarn over (yo), which adds a stitch, and a Centered double decrease (Cdd), which decreases two stitches. Looking at the pattern you may ask, why a Cdd? Why not just knit 3 together (k3tog) or slip 2 stitches, knit 1, passed slipped stitches over (skpsso)? Aside from the confusing acronyms, they each look slightly different. Here, the Cdd is used to create an elegant line between the holes of the yarnovers. If you are interested in learning more about decreases Knitty has a great article with photographs that illustrates the decreases mentioned here. The Cdd in Lace Kelly is the second example under Double Decreases.
Another thing to watch out for is the Cdd on rows 13 and 19. In order to have the Cdd that is at the end of the row work out, it will need to steal the first stitch of the next row. One way for this to work easily is at the beginning of rows 13 and 19, knit the first stitch. Then slip this stitch from its needle to the needle before it. Then you can start the row as written.

Happy Knitting! Don’t forget to pop over to our Ravelry group if you have any more questions and to update us on your progress!


