
Soft Launch
Posted: 31/01/2013 Filed under: Business, Craft, Quilting, SW101, SWCustomerContributions, SWeco, SWhowto, SWmain, SWpress, SWProducts, SWpromotions | Tags: craft, Knitting, lingerie wash, lizzy house, lornas laces, quilting, soak 1 CommentThere are many definitions of a Soft Launch. Today it’s the unoffical announcement of our new scent, Yuzu and our new Soakbox, Elvis Paisley.
Yes, it’s a bit crazy to use this format for such exciting news, but sometimes, that’s just how it goes. The official launch will be the week of February 11th, where you’ll get more details on what we are up to than you could ever hope for. Until then, here’s the long and short of our exciting accomplishments.

First: Yuzu. It’s the scent you’ve been waiting for. It’s so lovely it’s a bit silly. It is a kiss of tart citrus + crushed eucalyptus. It is currently available in our 3oz Soak bottles and 3oz Handmaid. It’ll be showing at TNNA this weekend, and on our website for sale (wholesale and retail) in the next week or so.
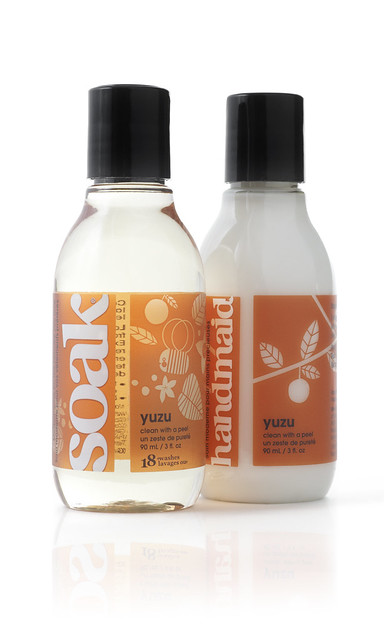
Second: You may notice Yuzu’s unique and lovely label. It’s the first in our upcoming series of designer labels. This label collection (yes, all 8 tiny bottles have different labels) is designed by the lovely and talented traditional fine art printmaker, and a turncoat commercial textile designer Lizzy House. Collectible, indeed.

Third: Yuzu appears in our newest Soakbox, Elvis Paisley. Once again, we’ve got a lovely custom color by Lorna’s Laces and a beautiful pattern designed by Fiona Ellis. We’re telling you this because in hours, we fly to The National Needle Arts Tradeshow in Long Beach where images, tweets and posts about these new products will surface and spread like, well, like new Soak scents do.
Here’s a sneak peek at the products. Between flights, set up and tradeshow time, we’ll do our best to get these products up and online sooner than later.
If you are a Soak retailer or would like to be, email chris@soakwash.com to order any of these products. If you are looking to shop, ask for them at your favorite yarn shop, bra fitting boutique or visit our website. The products won’t go live for a bit (sorry) and the Soakboxes won’t ship until mid-March, when they ship to lovely yarn stores around the world.
Watch in the coming weeks for more details on all the tiny fragments of exciting news we’ve shared today. We wanted you to hear about the excitement from us first. Enjoy as it all unfolds! And thanks again for choosing Soak. We are forever appreciative of the love you’ve shown for our products. It’s truly Soakworthy.
Weekly Affirmation: White Quilt Rescue
Posted: 18/10/2012 Filed under: SWmain, Testimonials, Uses for Soak | Tags: guild, hand washing, marking, pencil, quilting, sewing, spot cleaning, stain, washing, washing quilts Leave a commentEvery Thursday we post a comment, tweet, email or secret message we’ve received from one of our Soakworthy customers (stores, fans, consumers, friends). Sometimes, on a rough day, it’s really helpful to read an inspiring message from someone in our community. Someone who appreciates what we do. Someone who is as passionate about Soak as we are. We appreciate all the love that comes our way. Really we do.
Anonymous posted on the blog a while back.
“At the Guild we had a white quilt with marking pencil tracings that would not come out despite trying several different methods that usually work. We had a small sample of soak so decided to try it. We diluted it with a bit of water and dabbed it on the lines. Magically they disappeared leaving no residue and we had a much relieved quilt maker.”
So glad to hear that the quilt was saved! You can hop on over to our 101 Soak Uses to check out other creative uses for Soak products.
Karen’s Wedding Quilt. (it’s for Chandler too, don’t worry)
Posted: 09/06/2011 Filed under: Craft, Design, Knitting, Quilting | Tags: quilting 4 CommentsAuthor: Jacqueline
Home is where the heart is and where I go to sew.
Summer as usual. Great classes at the workroom and my schedule is too busy to take one. Class in question this summer? Johanna Masko’s Machine Paper Foundation Piecing: Houses class. I’ve been meaning to make a wall hanging for home, (translation, smaller quilt project that can actually be finished and enjoyed in newly renovated apartment) and I’ve also been meaning to take one of Johanna’s classes. I keep daydreaming while reading Karyn’s blog, watching progress, enjoying the project sampler, dreaming of making my own house.
Weddings are also part of summer and I was looking forward to the wedding of my friend (and award-winning photographer, in case you need one) from college Karen, who lives in Brooklyn, NY. Originally from Montreal (we were immediate friends, both Canadians at RISD), Karen may soon be moving to LA. They’ll likely keep residences in both locations, as home is where the heart is.

While looking through their bridal registry, I realized that I really wanted to make them a wedding gift rather than buying one. I know their Brooklyn pad is small, so a full size quilt seemed neither practical nor realistic. Plus, if they are moving to LA, large objects are not ideal for transportation.
After a bit of thought, and growing jealousy as I saw students from Johanna’s class begin to construct their houses and landscapes, I realized that I could transfer my envy into a house of my own. A Brownstone, for Karen and Chandler, so that even if they move to LA, they can take a little piece of Brooklyn with them. Okay, so they don’t actually live in a Brownstone, but it is a beautiful building that called out to be drawn in fabric.
Here is the process of how this little building came to be. From Google maps, to drafting, fabric hunting, cutting, sewing, pressing and sewing again. Birds, flowers, windows and clouds all came together to make a one of a kind gift, a labour of love for my good friends. In my usual way, I paid great attention to the back as well as the front, drawing inspiration from the invitations for this personalized patchwork homage to their home.
Both tutorial and roadmap, may this journey inspire you to draw your own home in fabric.
Additional images can be found here. Enjoy.
Google Maps. Satellite. Perhaps the first useful reason to look up a friend’s home. The ability to retrieve many photographs of a building in another country, without having to send a friend into the street. For future reference, I did confirm with Karen that she did live in this building. Be aware, too many questions draws unnecessary suspicion.

I then sketched out a section of the building and used the handy dandy office photocopier to enlarge it to a reasonable ‘wall hanging’ size. From there, I taped it together and placed some graph paper on top. I am pleased to say I used the last giant piece of drafting paper I have held onto for decades. I never wanted to throw it out, knowing that one day, I’d actually use it. I am both glad I had it for this project, and glad it is out of my life. Storing rolls of paper is challenging.

I used a think marker to outline the structure and planned the various sized windows, doors, entrance and roof line.

I stopped at the workroom on the way home one night, to seek out the perfect stash of fabric for this project. Some sky, some brick, window materials and trim. I also asked a couple of unsuspecting crafters if this project seemed a bit crazy to take on, with less than a month until the wedding. They said yes. In retrospect, they were right, but I loved every minute of it, day and night.
Even though this piece will be wall art, I felt compelled to pre-wash all the fabrics with Soak. It was an Unleash kind of day. I am the one at the office who receives the calls when wall art quilt pieces suffer colour runs or other laundry crises, so always best to pre-wash.
First section first, a simple panel with some angles and sky. I wanted to ‘test the waters’ on this project. I realized, that unlike the formal class at the workroom, where paper piecing is an art form and each student’s house is the same size, I was drawing with fabric and my grids and graph paper were becoming more guides than gospel. As I completed the first panel, the project began to take on its own life and I became consumed.

The windows are my favourite part. I created tiny tuck pleats to replicate the panes of glass seen in the building. As I worked across the image, I took a break from bricks and windows to create the front entrance.
I made larger than life flower pots with liberty print flowers (what else?) and allowed the feature light bricks to become the focal point of the structure.

Since my satellite images blocked most of my view, I allowed myself creative freedom to imagine the building, or at least how the building might appear as if it were made of fabric. The castle top of the building proved great fun. An homage to my friend Katrina, I actually cut and measured exact squares with exact seam allowances so they’d be even.

When I finally finished the front, I realized I hadn’t yet considered the back. That same day, Karen’s wedding invitation arrived by post, providing inspiration for the back and finishing details. The shade of red and variety of prints in the invitation ( I LOVE envelope linings) sent me rummaging through my fabric stash in search of reds, dots and lines. I found the off-cuts of a quilt I made last year, pieces 6-12 inches wide from the trim of a patchwork back, in all shades of red. It was perfect.

Using my free-motion stitch regulator (thank you Ted) I named, dated and signed the quilt before assembling the various pieces of the back. It’s hard to see the writing, but that’s the point, I guess. It’s not obvious, you just need to know it’s there.

Once I finished the back, I pieced it with the front, batting et al.
I used my walking foot for most of the quilting, following the diagonal brick work designs of the original building and outlining some of the windows. I’m a bit addicted to stitching in the ditch. In my next project, I might purposefully avoid the ditch, in an uneven, asymmetrical kind of way. Once I had covered enough brickwork, I used the free-motion foot to embellish the lighter front of the building. I put the building number on the awning and swirled around until the fabric itself told me I was done.
I added some clouds to the sky and I was set.

I tried to find the perfect binding fabric and realized that the building needed to be a continuation of each pattern piece. The sky needed to continue and the building needed to continue. No framing necessary. I added three hanging ribbons along the top and sewed on the binding. I made a note to myself that I must either find my box of binding clips (clean my studio) or buy more. Random bobby pins will not cut it. It is worth noting though, that the paper clip worked shockingly well.

I’m giving them a Lantern Moon bamboo hanger as well. This is the kind I have at the office holding up another quilt. It’s my favorite. I don’t think it’s fair to give someone a hanging quilt without telling them how to hang it. Some people prefer invisible hangers, although upon investigation, I couldn’t find one that was both fantastic and readily available. I like this design, it matches the brickwork and hopefully Karen and Chandler’s home, be it in Brooklyn, LA or wherever their life takes them.

My first (real) quilt
Posted: 19/04/2011 Filed under: Craft, Design | Tags: quilting Leave a commentAuthor: Jacqueline
Way back in November 2008, I finished my first real quilt. It lives on my sofa (usually under a kitty) and I love it every single day.

What should you do for your first quilt?
- Find a simple yet inspiring pattern.
- Choose a small range of fabric colours (or a fat quarter set/ layer cake etc. of pre-matched prints)
- Find a local hang out and some quilting friends
- Dig in.
- Hang-on until you are finished.
I certainly didn’t hit the list in the right order, but I made it from start to finish. I wanted to design my own quilt pattern, asymmetrical, off centre squares. I don’t recommend designing and constructing your first quilt yourself. Instead find a pattern that you love and start there.
At my first Quilt Sunday at The Workroom in Toronto, I met quilter (and teacher) extraordinaire Johanna Masko. I already had my fat quarter set, a collection of prints from Anna Griffin’s collection Evelyn. It was from one of my first trips to Quilt Market and I was in love. So, I told Johanna what I had in mind and she immediately introduced me to Denyse Schmidt’s book DS quilts.
The pattern, with a bunch of squares, was exactly what I was looking for. Big pieces, simple design, off-centre squares. There are several variations of this signature design, but the point is, only choose one major challenge per project. Mine was ‘make a full size quilt’, so there was no need to add designing to the list. Did I mention Denyse is also a RISD grad? Denyse’s project-packed how-to book is the alternative quilting resource for the home crafter.
With just 25 blocks, this project was inspiring enough to keep me going, and simple enough to work in small evening sections. First I made the squares. 
I did add a few more fabrics to my fat quarter set (once again breaking the rules), but at a quilt shop full of fabric, who could really resist. For the background colour, I used 3 shades on white- for some extra depth. It’s hard to see, but the different whites gives the quilt some interesting texture, and variety.

I used solid pink squares for the centre of each quilt and the border, and a variety of browns and complementary fabrics for the back. It is finished, well used and very much loved, as all quilts should be.
Learn to Quilt.
Posted: 08/04/2011 Filed under: Design | Tags: quilting Leave a commentJacqueline has many admirers of her quilts. Over the years, she’s received many questions about different techniques or tips that might help a new quilter get started. After a request from her friend Elizabeth to teach her how to quilt, we’ve decided to post Jacqueline’s mini-lessons on our blog so everyone can learn.
Dear Elizabeth,
It was such a pleasure to see you in New York last week. I love our meet-ups, however brief and infrequent.
I love that you want to learn to quilt so you can make them for your two beautiful boys. New quilt projects are always easier with a goal in sight. I believe the key to quilting is choosing patterns, fabrics and colors that inspire you, as well as your boys. While the quilt will soon become a cherished part of each boy’s life, it first has to motivate you to explore color, sew for hours and want to stay on track from start to finish.
The quilt has a few basic parts:
The top – generally patterned, made of small pieces sewn together, and the side that most people see and admire for years to come.
The bottom – often made of one piece of fabric, but in my world, it’s an opportunity to explore free forms without rules. I enjoy reversible quits, too, but that is another story.
The Batting – on the inside, sewn together either by hand or machine, or by long-arm quilting, again, that’s for another day.
No matter the project, the first steps are choosing your pattern and fabrics, not necessarily in that order. Come to think of it, there’s actually one step before that: finding your inspiration and quilting style.
Look through blogs, flickr, and magazines for patterns, color combinations and, of course, textiles to inspire tones, moods and shapes. Peruse through photos until you find a palette or pattern that stops you in your tracks. Use a fresh notebook to jot down thoughts and images as they surface.
This my unorganized batch of quilts on our flickr page. It’ll give you a quick indication as to whether or not I’m the right person to introduce you to the world of quilting. Make sure you visit the Fresh Modern Quilts group on flickr as well. This group always inspires me, and as you work through the images, you’ll meet new designers, bloggers and discover new patterns. I’ve been doing this for a while and realized I’m coming upon the same designers again and again, as my own personal style forms.

There are a few blogs I enjoy visiting. I find them inspiring and visually appealing, not only for quilting, but for other sewing and crafty stuff too.
Make Something is my friend Karyn’s blog. She owns the local shop, The Workroom, in Toronto. Her blog mixes quilts with sewing, crafts and generally inspiring stuff. It also links to the classes she has at the shop. I am usually travelling or too busy for classes, but I make it a point not to miss her Quilt Sunday or Stitch ‘n’ Bitch events. I’ve made new friends at these events and they are a world of inspiration too.
Purl in Soho is another great sewing and quilting resource that I highly recommend you visit next time you are downtown. They have a great blog with tutorials, projects and generally crafty stuff. My zigzag quilt in progress is influenced from that blog.

I wish I had the time to stay for a week and take you from start to finish. Instead, I thought we could have a weekly check-in. I’ll try to keep you on track from your first thoughts right through to completed quilts. This week is about getting familiar with the visual language of quilting. Next week I’ll show you my first quilt, and how it came to be my first real quilting project.
Can’t wait to talk quilts with you again next week. Now go find your inspiration!


